


Load testing is an important part of releasing a reliable API or application. Vegeta load testing will give you the confidence that the application will work well under a defined load. In this post, we will discuss how to use Vegeta for your load testing needs with some GET request examples. As it is just a go binary it is much easier to set up and use than you think, let’s get started.

What is Load testing?
Load testing in plain terms means testing an application by simulating some concurrent requests to determine the behavior of the application in the real world like scenario. Basically, it tests how the application will respond when multiple simultaneous users try to use the application.
There are many ways to load test applications/APIs and Vegeta is one of the easiest tools to perform load testing on your APIs or applications.
I had once written about fast and not so fast test, that would be a good post to read more about testing.
Prerequisites
Before jumping on the main topic let’s look at some prerequisites:
You are good with using the command line (installing and executing CLI apps)
Your application/API is deployed on a server (staging/production) to test it. Local tests are fine too still they might not give an accurate picture of how the server will behave on load.
You have some experience with load testing (may be used locust or Jmeter in the past)
Alternatives and why Vegeta
Load testing can be done in multiple ways, there are many different SAAS for load testing too. Still, locally installed tools are a great way to load test your application or API. I have used Locust in the past. The setup and execution are not as easy and straightforward as Vegeta.
Another option is to go with JMeter. Apache JMeter is a fully-featured load testing tool which also translates to knowing its concepts and having a steep learning curve.
Vegeta is a go-lang binary (and library) so installing and using it is a breeze. There are not many concepts to understand and learn.
To start with, simply provide a URL and give it how many requests per second you want the URL to be hit with. Vegeta will hit the URL with the frequency provided and can give the HTTP response codes and response time in an easy to comprehend graph.
The best thing about Vegeta is there is no need to install python or Java to get started. Next, let’s install Vegeta to begin Vegeta load testing.
Install Vegeta
Let us look at the official way Vegeta define itself:
Vegeta is a versatile HTTP load testing tool built out of a need to drill HTTP services with a constant request rate. It can be used both as a command-line utility and a library.
The easiest way to begin load testing with Vegeta is to download the right executable from its GitHub releases page. At the time of writing, the current version is v12.8.3.
Install on Linux
If you are on a 64-bit Linux you can make Vegeta work with the following set of commands:
cd ~/downloads
wget https://github.com/tsenart/vegeta/releases/download/v12.8.3/vegeta-12.8.3-linux-amd64.tar.gz
tar -zxvf vegeta-12.8.3-linux-amd64.tar.gz chmod +x vegeta ./vegeta --version
If you want to execute Vegeta from any path, you can add a symlink to your path executing a command like ln -s ~/downloads/vegeta ~/bin/vegeta , then it will work on a new CLI tab.
Install on Mac
You can also install Vegeta on a Mac with the following command:
brew update && brew install vegeta
If you already have go-lang installed on your machine and GOBIN in your PATH, you can try to start your Vegeta load testing journey:
go get -u github.com/tsenart/vegeta
Check if it installed properly with:
vegeta --version
You should see a version number displayed.
Your first Vegeta load testing command
There are multiple ways to use the Vegeta load testing tool, one of the simplest ways to get the output on the command line for faster analysis. To your first Vegeta load testing command execute the following:
echo "GET http://httpbin.org/get" | vegeta attack -duration=5s -rate=5 | vegeta report --type=text
So what just happened here?
We echoed the URL in this case httpbin.org/get and we passed it through Vegeta attack
vegeta attack is the main command that ran the Vegeta load test with 5 requests per second for 5 seconds
The last but equally important command executed was vegeta report get to show the report of the attack as text.
You can see a sample output below:
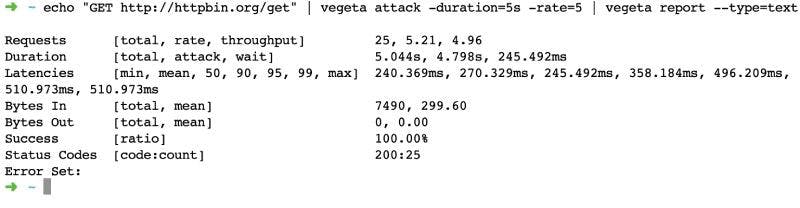
Vegeta load testing tool ran the attack of 25 requests spread over 5 seconds at 5 RPS. The minimum response time was 240 ms and the maximum was 510 ms with a 100% success rate. This means all the requests came back as a 200. Further, let’s have a look at how we can see a more graphical output.
Vegeta Load testing with graphical output
Another representation of Vegeta load testing results is an easy to understand graph. We can get a graph output with the below command:
cd && echo "GET http://httpbin.org/get" | vegeta attack -duration=30s -rate=10 -output=results-veg-httpbin-get.bin && cat results-veg-httpbin-get.bin | vegeta plot --title="HTTP Bin GET 10 rps for 30 seconds" > http-bin-get-10rps-30seconds.html
Let’s analyze how we used Vegeta for load testing httpbin.org here:
We went to the user home with cd command
Then we set up the URL for vegeta attack by echoing GET http://httpbin.org/get
This step is when we “attack” (a.k.a load test) httpbin servers at 10 requests per second for 30 seconds duration (so in total 300 requests in 30 seconds) we also specified that we want the output at results-vegeta-httbin-get.bin file
Now this result is like a binary that can’t be read easily so the next thing is we read the contents of this binary file with cat and passed it to vegeta plot with a fancy title and filename to get the HTML file
When we open the created HTML file we can see a graph like below in the HTML file:
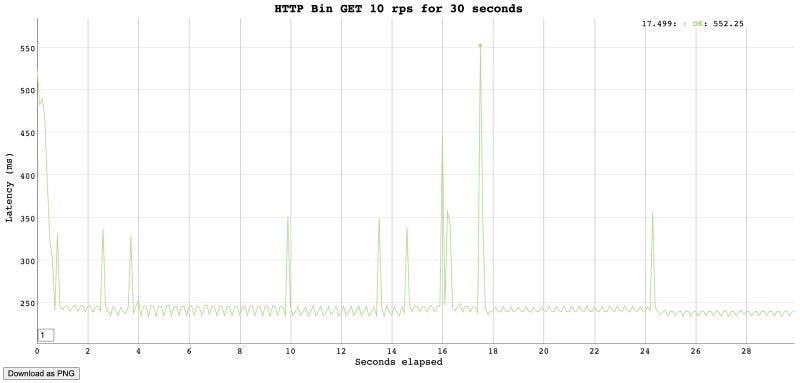
So we sent 300 requests and all of them came back with a 200, the max response time was 552 milliseconds. One of the fastest response times was 234 milliseconds. This gives us a clear picture that HTTP bin can easily handle 10 requests per second for 30 seconds.
I would advise you to not try it many times, HTTPBin.org might block your IP thinking you are DDOSing their system.
Generally, you get the idea of how you use Vegeta for load testing your own services.
My service uses an Auth token
Well, all the services won’t be open to all, most will use a JWT or some other way to authenticate and authorize users. To test such services you can use a command like below:
cd && echo "GET http://httpbin.org/get" | vegeta attack -header "authorization: Bearer <your-token-here>" -duration=40s -rate=10 -output=results-veg-token.bin && cat results-veg-token.bin | vegeta plot --title="HTTP Get with token" > http-get-token.html
This example uses the same pattern as the above one, the main difference here is the use of -header param in the vegeta attack command used for Vegeta load testing.
If you want to test an HTTP POST with a custom body please refer to the Vegeta docs. It is best to test the GET APIs to know the load unless you have a write-heavy application/API.
How do I load test multiple URLs?
Testing multiple URLs with different HTTP methods is also relatively easy with Vegeta. Let’s have a look at this in the example below with a couple of GET requests:
GET http://httpbin.org/get
GET [http://httpbin.org/ip](http://httpbin.org/ip)
Now similar to the first example with the text output run this command in the folder the targets.txt file is created: vegeta attack -duration=5s -rate=5 --targets=targets.txt | vegeta report --type=text
We will see a text output like below:
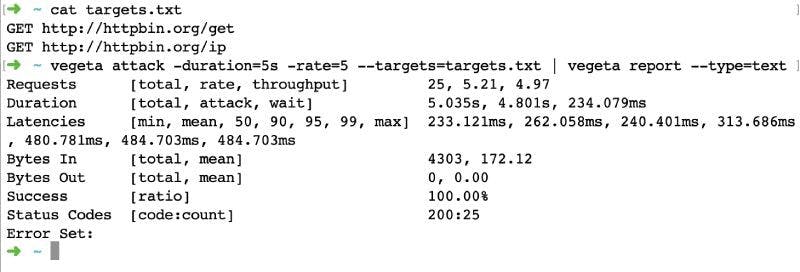
As we have seen doing load testing on multiple URLs with Vegeta is a breeze. Vegeta load testing can easily be done for other HTTP verbs like POST and PUT. Please refer to Vegeta docs.
Conclusion
This post was like scratching the surface with a primer on load testing with Vegeta. There are many advanced things that can be done with Vegeta load testing. Vegeta has been very useful on multiple occasions. I had once used Vegeta to load test Google Cloud Functions and Google Cloud Run with the same code to see the response time difference between those two for a talk. The graph comparing both the services made the difference crystal clear.
Load testing the application or API you want to go to production with is crucial.
We once had to open up an API to a much higher load than it would normally get. Our load testing with Vegeta really helped us determine the resources and level of horizontal scaling the API would need to work without any issues.
All thanks to Vegeta it was much easier than using another tool or service. Happy load and stress testing!